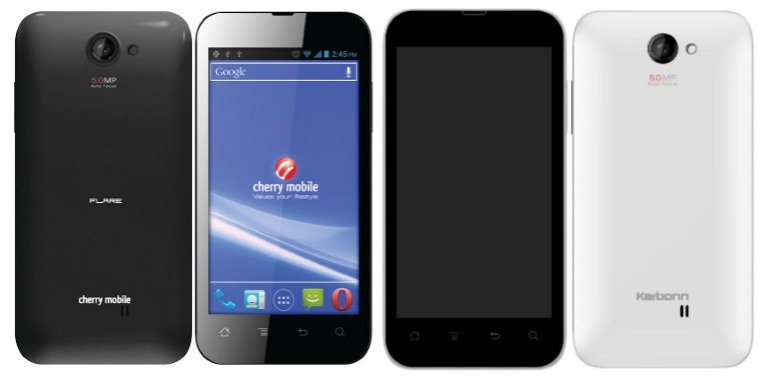


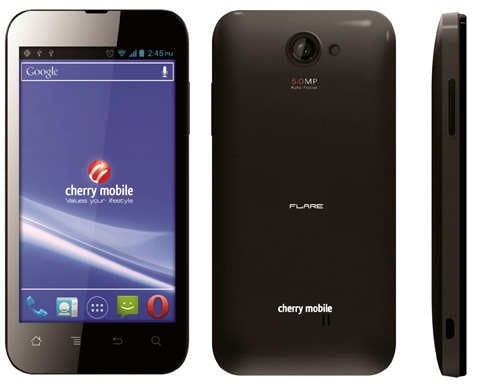
Cherry Mobile Flare Specifications
Android 4.0 Ice Cream Sandwich
Dual-SIM / Dual-Standby
4.0″ IPS capacitive touch panel with 480×800 pixel resolution
Qualcomm MSM8225 Snapdragon S4 1.2GHz dual-core processor
Adreno 203 GPU
512MB RAM
4GB internal storage (expandable up to 32GB via microSD)
5-megapixel rear camera with flash, VGA front-facing camera
EDGE / 3G / HSDPA
Wi-Fi, Wi-Fi hotspot
Bluetooth v2.1, microUSB v2.0
GPS, A-GPS support
160mAh battery
Dimensions: 123mm x 62.5mm x 11.8mm
Weight: 152 grams
Cherry Mobile Flare Un-Official FAQ (Frequently Asked Questions by ryanrudolf 11/22/2012)
1. Ano ang Cherry Mobile Flare (CM Flare)?
Budget friendly cellphone worth Php3999, pero hanep sa specs. Pinilahan ng napakaraming tao nung 11/17/2012, pang masa ang presyo. Hindi ako sumabay sa haba ng pila, nabili ko yung CM Flare ko 11/19/2012.
2. Sino ang gumawa ng CM Flare?
Rebranded ang CM Flare. Sa India ang pangalan nya ay Karbonn A9+. During driver installation, may lumalabas na Tianyu USB device etc etc. Tianyu mobile phone company sa China, most probably si Tianyu ang OEM, then pagdating sa India naging Karbonn A9+, then pagdating sa Philippines naging CM Flare.
3. Bakit ko (ryanrudolf) binili ang CM Flare?
Swak sa budget, android, maganda ang specs. Tinalo nya ung dati kong phone na nokia 1280 + blackberry curve 8320. Na-aadik ako sa android. Pangatlong android device ko ito, nagsimula sa Neo Omnipad, Nexus 7, then CM Flare. Android phone sa murang halaga.
4. Ano ang specs ng CM Flare? Ano ang sabi ng iba sa CM Flare?
Eto ang reviews ng iba't-ibang nakagamit na ng CM Flare -
http://www.pinoytechblog.com/archives/cherry-mobile-flare-review-is-it-really-worth-p3999
http://www.pinoytechnologies.com/cherry-mobile-flare-the-in-depth-review/
http://www.technobaboy.com/2012/10/25/cherry-mobile-flare-specs-price/
http://marvelgrindingwriter.blogspot.com/2012/11/the-fantastic-flare-flare-on.html
5. Saan makakabili ng CM Flare? Available pa ba? Saang branch meron? May warranty ba?
1 year warranty, 7days replacement warranty.
http://www.cherrymobile.com.ph/
https://www.facebook.com/cherrymobile
6. Magkano ang CM Flare?
As of 11/19/2012 , Php3999.
7. Ano ang dapat i-check habang bumibili ng CM Flare?
Build quality. Alugin ng pasimple, pakiramdaman kung may naalog sa loob. Dapat wala.
Check ang Sim1 and Sim2 kung nakakasagap ng signal.
Check ang phone functionality - txt at tawag.
Check ang touchscreen kung may ghost tapping habang naka-unplug / plug ang charger.
Check ang charger kung nagchacharge, pati battery indicator kung nagalaw during charging.
I-charge ng 5minutes, diskonek sa charger, dapat nadagdagan ang battery life.
Check ang USB cable kung nadedetect sa PC.
Check and microSD port kung nadedetect ang microSD card.
Check ang loudspeaker, magplay ng mp3, video etc etc
Check ang headset / headset port kung nagana.
Check ang wifi kung nakakasagap ng signal, check ang mobile internet kung nagana.
8. Known issues ng Flare:
Accelerometer hindi calibrated. Games na kelangan ng accelerometer gaya ng Temple Run, ung temple runner nasa left ng screen kahit ilapag sa flat surface. Kung calibrated ang accelerometer, dapat nasa gitna sya natakbo.
Default SMS app, hindi nag-oorient sa landscape mode.
4GB ang internal memory, 2.5GB~ lang ang available, occupied ng OS and backup ung nawawalang memory.
Maliit ang battery capacity nasa 1500mAH.
9. Dealbreaker ba ang known issues ng Flare?
Personal opinion, no. Decide kung bibili ka pa din ng Flare.
10. Nakabili na ako ng CM Flare, ano ang gagawin ko para ma-maximize ang unit?
Install drivers sa PC.
Backup muna bago kalikutin.
I-root ang unit (void ang warranty kapag rooted, pero pwede i-unroot)
Tanggaling ang preinstalled bloatware apps (kelangan rooted)
Tanggalin ang media files, video files, boot animation, pcdrivers sa system partition para mas malaki ang usable memory (optional, kelangan rooted)
Link2SD para mas madami ma-install na apps (kelangan rooted)
Tweaks para sa battery life.
Customize! Install apps, games, themes, boot animations etc etc!
11. Install drivers sa PC
Yung drivers ng CM Flare, naka-save sa internal memory as pcdrivers.zip. Disable muna ung USB Debugging via Settings > Developer Options > USB Debugging (uncheck). Connect CM Flare sa PC, para makuha ung drivers. May lalabas na extra drive sa My Computer, yun ung CM Flare. Unzip ung drivers. Diskonek si CM Flare, re-enable ung USB debugging, rekonek si CM Flare. Kapag nanghingi ng drivers, manually i-point dun sa unzipped folders nung drivers.
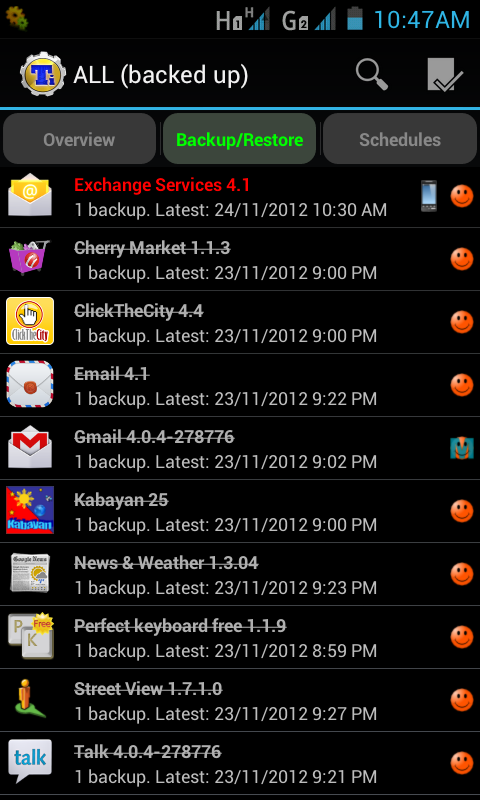
12. Backup muna bago kalikutin
Kapag rooted na ung phone, download mo itong romdump http://android.podtwo.com/romdump/romdump_v82b.zip
then follow mo ung guide dito http://android.podtwo.com/romdump/
once completed na ung romdump sa sdcard mo magkakaroon ng folder na romdump, sa loob ng romdump folder andun ung system.tar. yan na ung full backup ng /system partition mo.
kung /system/app lang ang gusto mo i-backup, install mo ung es file explorer / root explorer then kopyahin mo ung /system/app na folder.
pwede din titanium backup kung medyo nalilito pa. kung san komportable dun na lang muna.
NOTE: Incomplete pa itong part regarding backup, ang nabackup lang /system partition. Di ko pa alam kung pano mabackup ung /boot and /recovery partition.
13. I-root ang unit (void ang warranty kapag rooted, pero pwede i-unroot)
Dapat working na ung drivers.
Kelangan din ng ADB. Pwede gamitin ung pdanet http://pdanet.co/bin/PdaNetZ350.exe , pero mas gusto ko ung pure adb lang galing sa android sdk. Upload ko ung adb kapag may time . . .
Download mo ung root by bin4ry tool . http://forum.xda-developers.com/showthread.php?t=1886460
Extract mo ung zip file na nadownload, tas double-click RUNME.bat. Choose option 1 for normal. Follow the prompts.
Check mo ung CM Flare na phone, magkakaroon ng prompt na RESTORE, click mo ung RESTORE
Magrereboot ung phone, rooted na ung phone.
14. Ayaw ko na ng root, gusto ko tanggaling yung root
SuperSU > Settings > Full unroot
15. Pano malalaman kung rooted na yung phone?
check mo sa phone kung may SuperSu na app . . . kapag meron malamang rooted na. verify mo install ka ng terminal emulator, then type mo
su
dapat magprompt si SuperSU, DENY or GRANT. click mo GRANT dapat no error, then ung terminal emulator mo magbabago ung prompt magiging #.
pwede din pangcheck via adb. Konek mo si CM Flare sa PC, open ng command prompt, then type mo ito
adb shell
su
dapat magprompt sa phone DENY or GRAN, click mo ung GRANT dapat no error, then ung adb prompt magkakaroon ng #.
16. Tanggaling ang preinstalled bloatware apps (kelangan rooted)
Install ng ES File explorer / Root explorer.
Navigate /system/app
Delete the apps na ayaw nyo, example Cherry Market, etc etc.
May backup naman kayo diba, kung sinunod ung step about backup. :)
Reboot phone.
Pwede din gamitin ang Titanium Backup kung di pa sanay gumamit ng root explorer / es file explorer.
17. Tanggalin ang media files, video files, boot animation, pcdrivers sa system partition para mas malaki ang usable memory (optional, kelangan rooted)
Install ng ES File explorer / Root explorer.
Navigate /system/media
Pwede nyo delete lahat, wag lang ung 2 files na may extension na EMD. Di ko sure kung para saan ito.
Navigate sa /persist, delete ung pcdrivers.zip
May backup naman kayo diba, kung sinunod ung step about backup. :)
Reboot phone.
ROOTING
1. download Pdanet for windows here:
<click here for link>
2. install nyo then fallow nyo lang instruction (note wag nyo muna iconnect ung phone sa usb ah). when ask kung anong phone ang meron kau choose ung other brands
3. when ask to connect ung phone connect nyo na (note: be sure na usb debugging is enabled -makikita ito sa settings developer option check nyo ung usb debugging ). wait nyo lang macomplete ung installation/ driver instalation hanggang sa matapos, wala kaung gagawin kundi magintay..
after completion ng dinstalation ng pdanet.. time to root
4.download unlock root/b] from here
<click here for link>
5.install unlocck root and click root then your done :)
[b]CREDIT TO:mon2988 INSTRUCTION 1 TO 3 and to ais0n_06 INSTRUCTION 4 TO 5
FUNCTIONALITY TEST
1.gO TO DIALER
2.Dial *#36#
CREDIT TO:princedarwin_20
FM RADIO
CREDIT TO:Raymond Jay Golo
Download and install this apk <click here for link>
[TWEAK] Use the internal SD for Link2SD use
partition external micro SD - 2 primary partition both fat32
install and run link2sd from playstore, when asked which partition, select fat32. exit link2sd
edit the script created by link2sd located in /system/etc/install-recovery.sh
eto yung original script (may .bak kasi na-edit ko na)
shell@android:/system/etc $ cat install-recovery.sh.bak
cat install-recovery.sh.bak
#!/system/bin/sh
#added by link2sd
LOG=/data/link2sd-install-recovery.log
echo "$(date) mounting..." > $LOG
mount -t vfat -o rw /dev/block/vold/179:34 /data/sdext2 1>>$LOG 2>>$LOG
mount -t vfat -o rw /dev/block/mmcblk1p2 /data/sdext2 1>>$LOG 2>>$LOG
mount >> $LOG
eto ung edited script -
shell@android:/system/etc $ cat install-recovery.sh
cat install-recovery.sh
#!/system/bin/sh
#added by link2sd
LOG=/data/link2sd-install-recovery.log
echo "$(date) mounting..." > $LOG
mount -t vfat -o rw /dev/block/vold/179:34 /data/sdext2 1>>$LOG 2>>$LOG
mount -t vfat -o rw /dev/block/mmcblk0p19 /data/sdext2 1>>$LOG 2>>$LOG
mount >> $LOG
echo "$(date) mount finished" >> $LOG
ang papalitan na line eh ung 2nd mount. ung original script ung 2nd mount nakaturo dun sa 2nd partition ng external SD (mmcblk1p2), papalitan ng mmcblk0p19, yan ung internal SD partition.
shell@android:/system/etc $ cat /proc/partitions
cat /proc/partitions
major minor #blocks name
179 0 3784704 mmcblk0
179 1 20 mmcblk0p1
179 2 150 mmcblk0p2
179 3 40960 mmcblk0p3
179 4 1 mmcblk0p4
179 5 1500 mmcblk0p5
179 6 1000 mmcblk0p6
179 7 2000 mmcblk0p7
179 8 10240 mmcblk0p8
179 9 3072 mmcblk0p9
179 10 3072 mmcblk0p10
179 11 3072 mmcblk0p11
179 12 253952 mmcblk0p12
179 13 604800 mmcblk0p13
179 14 20480 mmcblk0p14
179 15 65536 mmcblk0p15
179 16 10240 mmcblk0p16
179 17 1000 mmcblk0p17
179 18 1000 mmcblk0p18
179 19 2700000 mmcblk0p19
179 20 1000 mmcblk0p20
179 21 37203 mmcblk0p21
179 32 15558144 mmcblk1
179 33 15550888 mmcblk1p1
shell@android:/system/etc $
make sure ung output sa iyo meron nung mmcblk0p19 . . . tingin ko dito din nagtatago si recovery.img and boot.img, di ko lang sure kung anong mmcblk
once na edit na, power off mo ung phone. tanggalin ung external SD, repartition ulit, tanggaling mo na ung 2 primary FAT32 partition, i-partition na lang ng isang primary FAT32. rekonek and enjoy.
credits dito - http://www.modaco.com/topic/356349-using-link2sd-to-use-internal-sd-as-extsd/ and ryanrudolf
7 Apps for Root Users
Deciding to root your phone shouldn't be a split-second decision. But ultimately, it's your phone, you own it, and you can do what you want. So if you do root your Android, here are seven starter apps you'll want to download. You'll need the first and second apps immediately in order to actually do anything with your root access, but the other apps are all optional and can be downloaded in any order.
Superuser: lets you manage superuser (root user) permissions; this is the first app a newly rooted phone needs installed on it.
Root Explorer (File Manager) ($3.80): shows you the files you can now access as a root user; this is the second app a newly rooted phone needs on it.
Titanium Backup root: backs up all your apps, removes bloatware, and otherwise helps you manage apps.
ROM Manager: lets you manage and install ROMs from your SD card, and organize and perform backups and restores.
AdFree Android: removes most ads from your browser and apps.
Wireless Tether for Root Users: turns your phone into a mobile hotspot.
SetCPU for Root Users: changes the CPU settings for overclocking (going faster than the limit) and lets you set thresholds (like a temperature) to tell it when to stop; works only on select phones.
credits from pcmag.com articles and darkalex317
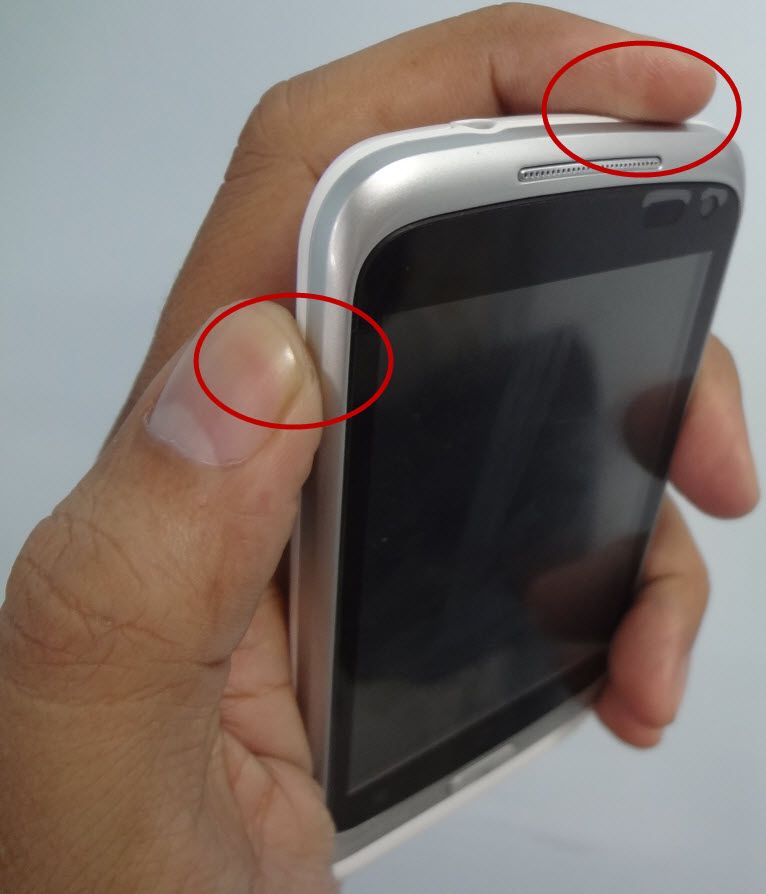
problem regarding funky touchscreen while charging
try niyo gumamit ng better quality charger (as example: yung mga 1000 ma charger na kasama sa mga samsung, blackberry, or yung iphone).
hindi kasi maganda ang "electrical isolation" (electrical engineering term) ng kasamang charger ng flare. ang solusyon lang dyan bumili kayo ng ibang charger o kaya huwag niyo gamitin yung phone habang nagcharge. hindi lang yung CM flare may ganitong issue, medyo madami dami na din akong phone na nagamit na may ganitong issue.
ang gamit ko ngayon charger nung dati kong W900 (yung dragon phone). ok yung touchscreen kapag yun gamit ko. kahit yung mga charger ko sa samsung na i9000 ok din dun.
tingin ko huwag na kayo umasa na bibigyan kayo ng cherry mobile ng better quality charger, considering na 3,999 lang tong phone na to. bumili na lang kayo, and as a suggestion: test niyo muna yung charger before purchase para siguradong hindi present yung problem.
_________________________________________________
in addition, para sa mga taong may problem sa dead trigger: HINDI TOTOO na yung ghosting screen ay kasama sa effects ng dead trigger FYI
ang solusyon dyan, kelangan naka root ka. edit mo yung build.prop, tapos change mo yung mga values sa debug.composite.type to GPU.
yung nasa setting ng cm naka MDP at DYN na setting. yan ang cause ng issue.
reminder lang: i am not liable for any damage to your phone. kayo magedit ng build.prop nyo. pag nasira niyo phone niyo mali ginawa niyo. yung sa akin OK na OK.
_________________________________________________
ang opinyon ko naman sa phone na to. sulit sya sa halagang 4k php kahit na may minor problems (actually kahit mamahaling telepono may mga problema agree? ang nilamang lang nila ay better after sales support).
kung ok lang sa inyo yun ibang mga problema ng phone na to at you can live with it, by all means bilin niyo to hindi kayo madidismaya.
siguro ang reklamo ko lang dito sa phone na to ay wala pang CWM recovery. medyo mahirap magedit ng files pag wala kang paraan para marestore yung phone ng mabilisan kapag nagkamali ka.
credit:LXG_SELLER
SAFE TO REMOVE APPS
credit:acro
Note: Credits to user ais0n_06 for compiling this in a separate thread <click here for link>
Android system recovery
Para po sa lahat na gusto lang malaman kung paano i-access ang built - in recovery utility ng CM Flare.
Follow this instructions po. *Pictures/illustrations are not the actual CM Flare and is posted for the procedures.
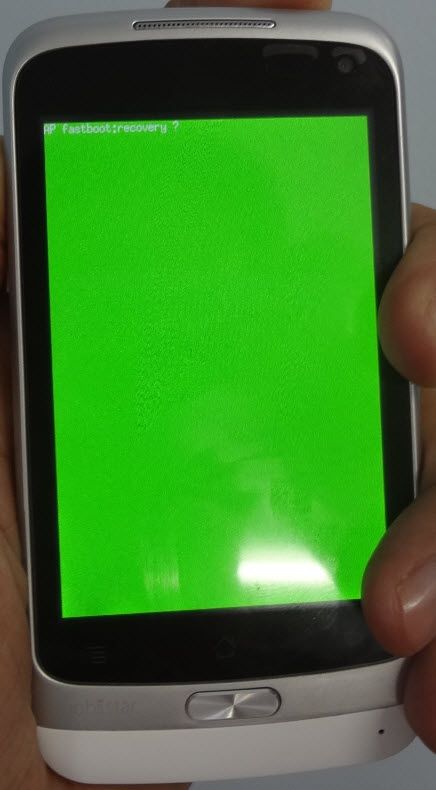
1.0) Reboot your phone into the bootloader, by turning it off and holding [vol-up]+[power]
2.0) Wait till screen turns green and says fastboot:recovery ?, Like below
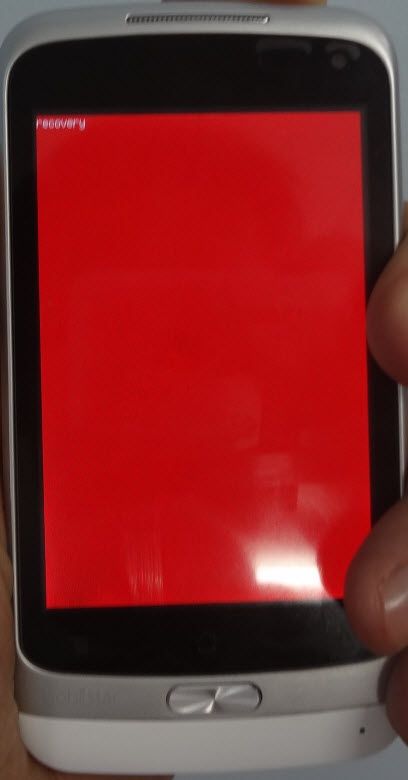
3.0) Until the recovery screen appears red, then let go of the buttons.
4.0) Android system recovery utility shows up. (see image below)
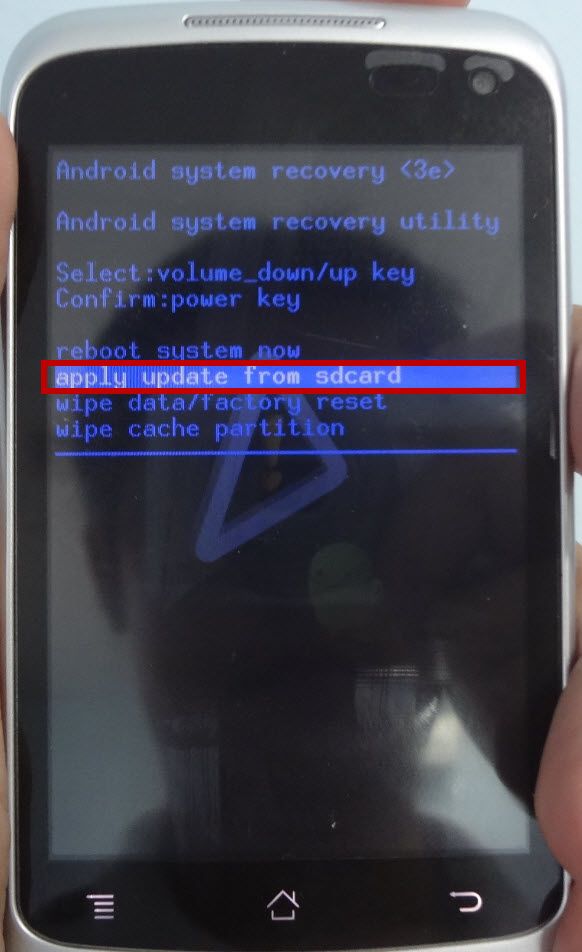
Android system recovery <3e>
Android system recovery utility
Select:volume_down/up key
Confirm:power key
reboot system now
apply update from external storage
wipe data/factory reset
wipe cache partition
apply update from cache
NOTE: Sorry po pero walang option for back up and recovery.
Note: Credits to user HwarangYushin
Update*** 121912
Attention... Offline update for CM Flare
May nakapag upload na ng offline update ng flare.
salamat kay ako si opaw sa image at Marc Gionggo sa flasher.
Image = <click here for link>
Flasher = <click here for link>
[quote]Ito yong Steps:
1. Connect your phone to pc/laptop via usb.
2. Boot up your phone in fastboot mode by pressing & holding Vol up + Power until you will see a green screen then release the 2 bottons.
3. Open up the Android AIO Flasher software
4. On AIO Flasher tab, under Fastboot Flasher(NANDroid Restorer), Select Parition;
(Depende po kung anong file e flash mo either System, Boot, Recovery..)
5. Then Select File, browse the img file to use when Flashing. (kung system.img, dapat system din pinili sa Select Partition.. ganun din gawin mo sa boot at recovery dapat boot piliin sa Select Partition kung boot.img ang e flash mo.. )
6. Check the Erase box and finally click Flash and wait until it completes flashing the img file to you phone. (Makikita mo yong button ng Flash ay naging Flashing.. wait mo lng matapos at magiging Flash ulit yong nsa button...
NOTE:
(Gawin mo yan steps 5 and 6 one after the other or isa-isa, meaning tatlong beses ka mag flash dahil tatlong file yan yong system, boot at recovery)
7. Reboot your phone. Enjoy your fix phone.
I'm not responsible sa anumang magyayari sa cp mo.. flash it with your own freewill.. pero tried and tested na to..
Ne-revise ko lng yan kunti ang steps...
Credit po kay Paul Angelo E. Caliva at Ako Si Opaw sa FB group...[/quote]
FM radio app kahit di rooted
<click here for link>
One click build.prop and various tweaks for CM Flare! by ryanrudolf
Build.prop fix for shadowgun etc etc
200dpi, slightly better in my opinion than stock 240
Project butter <click here for link>
V6 Supercharger <click here for link>
Fix redundant / duplicate entries in build.prop
Volume rocker wake (kevin of betterflare)
Stock Battery Icon with percentage (kevin of betterflare)
Smooth scrolling, 30step volume, no vibrate on unlock (kevin of betterflare)
Modified gps conf
Modified hosts file for adblocking
As usual, this script will first backup your current files in backup99 folder -
build.prop
framework.jar
framework-res.apk
SystemUI.apk
android.policy.jar
7x27a_kp.kl
gps.conf
hosts
Hope you like this one!
Flared-v0.01.zip - <click here for link>
Requirements - ROOTED, USB debugging mode and adb driver.
Make sure you press GRANT on your phone when SuperSU prompt appears.
Unzip the file flared-v0.01.zip to your PC, plug phone to PC, run flared-v0.01.bat. Enjoy!
EDIT: added mediafire link
EDIT: updated script, fixed cp command; should be busybox cp. tested working. Feedback please. Thanks.
HOWTO - root using the CWM way!
Alternative way of rooting the CM Flare / Karbonn A9+. Tested working using CWM5.0.2.8 by Ekloyva and CWM-SuperSu-v.099 by Chainfire.
Requirements -
adb / fastboot binaries and drivers
Download the CWM 5028 recovery from here - http://forum.xda-developers.com/showthread.php?t=2057511
Download the SuperSU CWM flashable zip from here - http://forum.xda-developers.com/showthread.php?t=1538053
Save the SuperSU CWM flashable zip to the root of internal memory of flare (not the microsd).
Extract the CWM5028 zip file.
Decide if you want to install CWM5028 or just boot to CWM5028. If you want to install CWM5028, run the included batch file cwm_recovery.bat.
If you want to just boot to CWM, reboot the phone to fastboot mode via VOL+ and POWER or via adb reboot bootloader, and then when on fastboot mode, perform a
fastboot boot cwm5.0.2.8recovery.img
Phone will be on CWM. Using VOL- navigate
Install ziip from sdcard (then press power button)
Choose zip from sdcard (then press power button)
Navigate to CWM-SuperSu-v0.99.zip (then press power button)
Yes (then press power button)
Once complete, press VOL+ , highligh reboot system now, then press power button.
Congrats! You are now rooted using the CWM way!
If you install CWM, overwriting the stock recovery, reboot first to boot loader using VOL+ and POWER, when it goes to green fastboot screen keep holding the buttons until it goes to the CWM recovery.
Personal preference I did not install the CWM, I just let it boot using the fastboot command.
HOW TO- Quickly install backup apk files without transferring to phone
Most of us when installing backup apks, we transfer them first to the phone, and once transferred to the phone we use a file manager to manually install the apks one by one. Here is my alternative method, much quicker / faster. Needs adb drivers and adb binary. (I would assume we already have this working, since most of us are already rooted).
save as batch file (install.bat)
dir /b *.apk > apk.txt
for /f %%A in (apk.txt) do adb install %%A
place all apks in one folder, together with the batch file and adb binary. run install.bat and enjoy!
credits to M$ for the batch scripting language.
HOWTO - manually identify which splash partition to backup before flashing a custom splash.img
splash.img files are 1MB in size, you need to check the partitions that have 1MB in size, issue the ff command in PC
adb shell
cat /proc/ partitions
it will show the partitions similar to this -
shell@android:/system/etc $ cat /proc/partitions
cat /proc/partitions
major minor #blocks name
179 0 3784704 mmcblk0
179 1 20 mmcblk0p1
179 2 150 mmcblk0p2
179 3 40960 mmcblk0p3
179 4 1 mmcblk0p4
179 5 1500 mmcblk0p5
179 6 1000 mmcblk0p6
179 7 2000 mmcblk0p7
179 8 10240 mmcblk0p8
179 9 3072 mmcblk0p9
179 10 3072 mmcblk0p10
179 11 3072 mmcblk0p11
179 12 253952 mmcblk0p12
179 13 604800 mmcblk0p13
179 14 20480 mmcblk0p14
179 15 65536 mmcblk0p15
179 16 10240 mmcblk0p16
179 17 1000 mmcblk0p17
179 18 1000 mmcblk0p18
179 19 2700000 mmcblk0p19
179 20 1000 mmcblk0p20
179 21 37203 mmcblk0p21
179 32 15558144 mmcblk1
179 33 15550888 mmcblk1p1
shell@android:/system/etc $
you want to backup the partitions that are 1MB (1000) in size . . .
dd if=/dev/block/mmcblk0p6 of=/sdcard/splash1.img
dd if=/dev/block/mmcblk0p17 of=/sdcard/splash2.img
dd if=/dev/block/mmcblk0p18 of=/sdcard/splash3.img
dd if=/dev/block/mmcblk0p20 of=/sdcard/splash4.img
how to check which one is the correct partition that holds the CM image? via ffmpeg
ffmpeg -f rawvideo -pix_fmt rgb565 -s 480x800 -i splash1.img -f image2 splash1.png
ffmpeg -f rawvideo -pix_fmt rgb565 -s 480x800 -i splash2.img -f image2 splash2.png
ffmpeg -f rawvideo -pix_fmt rgb565 -s 480x800 -i splash3.img -f image2 splash3.png
ffmpeg -f rawvideo -pix_fmt rgb565 -s 480x800 -i splash4.img -f image2 splash4.png
open the 4 PNG files, on my CM Flare, the correct one that displays the CM Logo is splash4.png. Based on that, the splash partition is on the mmcblk0p20, that is the one that you need to backup.
Happy flashing!
credits here regarding ffmpeg - http://forum.xda-developers.com/showthread.php?t=1356202
HOWTO - backup / restore partitions the manual way - part2
This is like a CWM full nandroid backup, but using adb / fastboot combo. There is already a working CWM but its just me, I still didnt flashed it and waiting for further development.
needs to be rooted, adb drivers and adb binary installed and have microsd inserted from PC commnd prompt, perform the following -
adb shell
su
mount (to display the partitions)
it will show something like this -
C:Usersryanrudolf>adb shellshell@android:/ $ susushell@android:/ # mountmountrootfs on / type rootfs (ro,relatime)tmpfs on /dev type tmpfs (rw,nosuid,relatime,mode=755)devpts on /dev/pts type devpts (rw,relatime,mode=600)proc on /proc type proc (rw,relatime)sysfs on /sys type sysfs (rw,relatime)none on /acct type cgroup (rw,relatime,cpuacct)tmpfs on /mnt/asec type tmpfs (rw,relatime,mode=755,gid=1000)tmpfs on /mnt/obb type tmpfs (rw,relatime,mode=755,gid=1000)none on /dev/cpuctl type cgroup (rw,relatime,cpu)/dev/block/mmcblk0p12 on /system type ext4 (ro,relatime,user_xattr,barrier=0,data=ordered)/dev/block/mmcblk0p13 on /data type ext4 (rw,relatime,user_xattr,barrier=1,nodelalloc,data=ordered,noauto_da_alloc,discard,noinit_itable)/dev/block/mmcblk0p14 on /persist type ext4 (rw,nosuid,nodev,relatime,user_xattr,barrier=1,data=ordered)/dev/block/mmcblk0p15 on /cache type ext4 (rw,relatime,user_xattr,barrier=1,data=ordered,noauto_da_alloc,discard)/dev/block/vold/179:33 on /mnt/sdcard type vfat (rw,dirsync,nosuid,nodev,noexec,relatime,uid=1000,gid=1015,fmask=0000,dmask=0000,allow_utime=0022,codepage=cp437,iocharset=iso8859-1,shortname=mixed,utf8,errors=remount-ro)/dev/block/vold/179:33 on /mnt/secure/asec type vfat (rw,dirsync,nosuid,nodev,noexec,relatime,uid=1000,gid=1015,fmask=0000,dmask=0000,allow_utime=0022,codepage=cp437,iocharset=iso8859-1,shortname=mixed,utf8,errors=remount-ro)tmpfs on /mnt/sdcard/.android_secure type tmpfs (ro,relatime,size=0k,mode=000)/dev/block/vold/179:19 on /mnt/sdcard/SD_CARD type vfat (rw,dirsync,nosuid,nodev,noexec,relatime,uid=1000,gid=1023,fmask=0000,dmask=0000,allow_utime=0022,codepage=cp437,iocharset=iso8859-1,shortname=mixed,utf8,errors=remount-ro)shell@android:/ #
what we need is the entries for /data and /cache
dd if=/dev/block/mmcblk0p13 of=/sdcard/data.img
dd if=/dev/block/mmcblk0p15 of=/sdcard/cache.img
you also need to backup boot, recovery and system (from previous tutorial) -
dd if=/dev/block/mmcblk0p8 of=/sdcard/boot.img
dd if=/dev/block/mmcblk0p16 of=/sdcard/recovery.img
dd if=/dev/block/mmcblk0p12 of=/sdcard/system.img
To restore the backup partitions - boot to fastboot mode (vol+ and power button / or via adb reboot bootloader) , fsatboot drivers and fastboot binary installed, copy of backup partitions from PC command prompt, perform the following - adb reboot bootloader (reboots to fastboot mode without doing the VOL+ power button trick)
fastboot erase boot
fastboot erase recovery
fastboot erase system
fastboot erase data
fastboot erase cache
fastboot flash data data.img
fastboot flash cache cache.img
fastboot flash boot boot.img
fastboot flash recovery recovery.img
fastboot flash system system.img
fastboot flash recovery cwm.img (optional to flash cwm recovery)
fastboot reboot
HOWTO - backup / restore partitions the manual way
How to backup the partitions of flare -
needs to be rooted, adb drivers and adb binary installed and have microsd inserted
from PC commnd prompt, perform the following -
adb shell
su
dd if=/dev/block/mmcblk0p8 of=/sdcard/boot.img
dd if=/dev/block/mmcblk0p16 of=/sdcard/recovery.img
dd if=/dev/block/mmcblk0p12 of=/sdcard/system.img
dd if=/dev/block/mmcblk0p20 of=/sdcard/splash.img
mmcblk0-8 - this is where the kernel lives
mmcblk0p12 - this is where the system file lives. performing factory reset resets the system.img partition to the default
mmcblk0p16 - this is where the stock recovery lives
mmcblk0p20 - this is where the custom splash.img lives
Now that the partitions are backed up, we can play safely with our flare, less fear of brick. :)
To restore the backup partitions -
boot to fastboot mode (vol+ and power button / or via adb reboot bootloader) , fsatboot drivers and fastboot binary installed, copy of backup partitions
from PC command prompt, perform the following -
adb reboot bootloader (reboots to fastboot mode without doing the VOL+ power button trick)
fastboot erase boot
fastboot erase recovery
fastboot erase system
fastboot flash boot boot.img
fastboot flash recovery recovery.img
fastboot flash system system.img
fastboot flash recovery cwm.img (optional to flash cwm recovery)
fastboot reboot
HOWTO - script to automate the unbloating of /system/app
Requirements - rooted, adb drivers install, usb debugging enabled.
Make sure you press GRANT on your phone when SuperSU prompt appears.
Extract the UNBLOAT.ZIP file and then run the UNBLOAT.BAT file - http://www.mediafire.com/?zk52puau2ld9ihg
I've created a script that will automate the unbloating of system/app. This script will backup the contents of /system/app to a folder on your PC called backup99. After the backup is completed it removes the following bloatwares in /system/app -
Calculator.apk
ClickTheCity.apk
DeskClock.apk
Email.apk
Gallery2.apk
GenieWidget.apk
Gmail.apk
GMS_Maps.apk
Kabayan.apk
LiveWallpapers.apk
MBazaarCherryMarket.apk
Music.apk
MusicFX.apk
OperaMini.apk
Perfectkeyboardfree.apk
QuickSearchBox.apk
SoundRecorder.apk
Street.apk
Talk.apk
talkback.apk
TYFILEBROWSER.apk
TYWorldClock.apk
VoiceSearch.apk
Wiper.apk
YouTube.apk
You can install your preferred 3rd party apps after unbloating, or you can edit the script.txt file and remove entries you want to retain. Enjoy!
cherry mobile flare adb driver <click here for link>
Official Software Update for Flare
Good news to all FLAREnatics out there! Today we�re rolling out a new software update for Cherry Mobile FLARE. This contains improvements and fixes for G-sensor, auto-rotate (SMS), and FM radio support.
Download Update:
� Flare software update (146MB)
<click here for link>
Mirror Link
<click here for link>
Instructions:
1. Save the update file to the root of the SD card. Turn off the phone. Make sure phone is charged atleast 15%.
2. Press and hold Power+volume Up for a few seconds. It will display first a green screen.
3. Release the button after the screen shows a red display to show the Android sytem revocery.
4. Select apply update from external storage' and select the update file. Use volume keys to select and power key to confirm.
5. The phone will update. After update is finish, select reboot system now.
Note: SD Card update will not erase multimedia files like photos. It will just erase saved application. It is also advisable to do Factory data reset after doing SD card update.
Cherry Mobile Flare rooting via stock recovery
I've compiled the files needed to be rooted in a flashable zip via CM Flare stock recovery mode.
This means
- you don't need to install adb/fastboot drivers to root your precious Flare.
- if you can download the file in your Flare directly, you can root your precious Flare even without a computer!
1) Download this file: <click here for link> (pass: flare101)
2) Copy it to the root folder of your EXTERNAL microSD card
3) boot into stock recovery mode (see page 1 for this procedure)
4) in recovery mode screen, select "apply update from external storage" (hold the power button to execute)
5) select the zip file you just saved in your EXTERNAL microSD card (hold the power button to execute)
6) wait for the process to finish
7) reboot
YOUR FLARE SHOULD NOW BE ROOTED!
(verify if you have SuperSU app in your apps)
package contains:
- su (installs to /system/xbin/)
- Superuser.apk by the mighty Chainfire (installs to /system/app/)
- busybox (installs to /system/xbin/)
Notes:
1) you would see some signature "verification failed" warnings as the process progresses. simply ignore it.
2) the process is the same as CM instruction for v37 OTA update (<click here for link>)
3) this can also be done via CWM recovery
4) no symlinks for busybox applets (will do this when i get the time)
ICS TO Jellybean Update
<click here for link>
Credit kay sir BLGR
Goodbye MP a878-a898 and SM Astra!.. Hello CM Flare. :)
-- edited by icedtea on Dec 13 2013, 11:45 PM